
Live From Mars was active July 1996-December 1997.
|
Teacher Background: Mapping Mars with Global Surveyor The Viking orbiters provided wonderful pictures, and subsequent image processing created mosaics of most of Mars. But much important information is still missing. An example is something as basic as the elevation of future landing sites. Because Mars' atmosphere is so thin, parachutes are relatively less effective than here on Earth. (There's less resistance to slow the spacecraft down: Newton's Laws, once more!) So, it's critical to know how thick a layer of Martian atmosphere you're traveling through before you reach the surface. If the landing sites are too high up, there'll be too little atmosphere, and you may design a braking system that won't work well enough to slow your descent! Ouch... back to the drawing board. Current uncertainties about Martian elevations are as large as 3 kilometers, enough to make spacecraft designers very nervous. Enter "MOLA." One of the six instruments on board Mars Global Surveyor will be the Mars Orbiter Laser Altimeter (MOLA). MOLA's laser will fire pulses of infrared light 10 times each second. By measuring the length of time it takes for the light to reflect off the Martian surface and return to the spacecraft, scientists can determine the distance to the planet's surface. (Spacecraft navigation data gives the distance of MGS from the center of the planet, so putting the two data sets together will yield Martian surface elevation with a precision of a few tens of meters.) MOLA will provide information to construct the first full topographic map of Mars, showing fine details of plains, valleys, craters and mountains. Note: Since topographic maps use sea level to define zero elevation, we Earthlings measure the height or depth of all landforms relative to sea level. Of course there's no sea on Mars, so scientists describe elevations relative to a zero level that is called the "datum" surface.
Objectives |
Vocabulary altimeter crater datum surface infrared landform laser mountain plain probe pulse radar simulate sonar terrain topographic map valley |
|
Materials: for each team of 3/4 students
|
|
|
Engage Explain why NASA needs elevation data from Mars, and how MOLA operates, or have teams go on-line and research MOLA and report back. As noted above, the altitude of a landing site can be crucial for spacecraft safety. Tell students that they represent a NASA Mission team specializing in mapping the elevation of a little known planet. This Activity simulates the process of gathering data about a surface which can't be measured directly. Working in teams, students will first construct a segment of Mars-in 3 dimensions-from current contour maps, without revealing its exact topography to other teams. This Challenge landscape will be hidden inside a securely-closed shoebox. Each team, in turn, will receive a Challenge landscape created by another team, and unknown to them. Their mission is to collect simulated altimeter data on the Challenge landscape, and create a 3-D paper profile map of what they think is hidden in the box (the "Result" landscape). At the end of the Activity, they'll see how accurately Challenge and Result landscapes match. Note: Ideally, this is a two stage Activity: you can do just the measuring activity, but the students will benefit both from creating the Challenge and Result landscapes (scaling, plotting, cooperation and model-making skills) which will let them literally get their hands on two sections of Mars. Explore
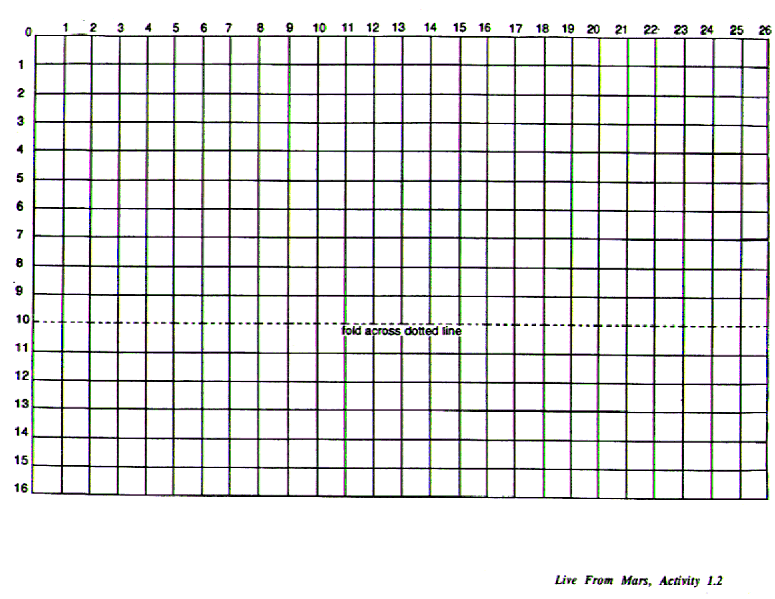
Procedure 1. Working from the sections of contour maps you provide, each team should make a three-dimensional Mars landscape covering the bottom of the shoebox. 2. Tape or glue a piece of cm grid paper to box lid. Label horizontal and vertical axis 0, 1, 2, 3, etc. 3. Using a sharpened awl or leather punch, punch small holes at intersections of the grid. Be careful! 4. Seal box with tape. Exchange the closed Martian Challenge boxes. | Altimeter Simulation: Tell students that they will now simulate the Mars Orbital Laser Altimeter using the "Altimeter rod" and collect data representing the Mars terrain hidden in the shoebox. The teacher might want to demonstrate the following procedure: 1. Find the coordinates (0,0) on the box top. 2. Insert the Altimeter rod into the hole at (0,0), until it comes in contact with the landform inside. 3. Keeping the rod upright, measure how much is showing above the lid. Subtract this from its full 10 cm. length to find the distance from "orbit" (lid) to surface (or use a piece of easily removable paper tape as a marker, and remove and measure the rod.) 4. On the graph paper plotting grid, locate the (0,0) coordinate and count down the number of centimeters which the rod measured. Plot this point on the grid. 5. Repeat this procedure across the row (0,1), (0,2) (0,3), (0,4), etc. to (0,30). 6. Connect the altimeter readings across the row. 7. Cut along this data line. 8. Fold along the dotted line (row 10) and glue on the appropriate row (0,0 for the example above) of the grid support. You now have the first row of your three dimensional Mars landscape. (See Diagram) |
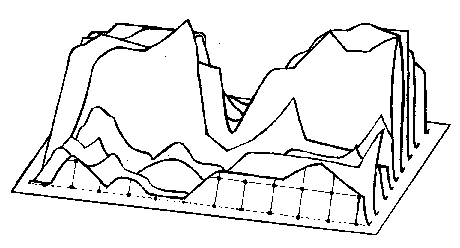
Note: to move things along, in a team of 3-4 students, one might be MOLA and collect and measure altitude, one might plot the data points, and another might cut out and assemble the profile sheet once each row of data has been collected. Students should rotate through tasks to expose each of them to all parts of the process.
Repeat this procedure for:
After class has completed the hands-on procedure:
1. Look at the Challenge and Result profiles. Ask students to determine which "Result" corresponds to which "Challenge."
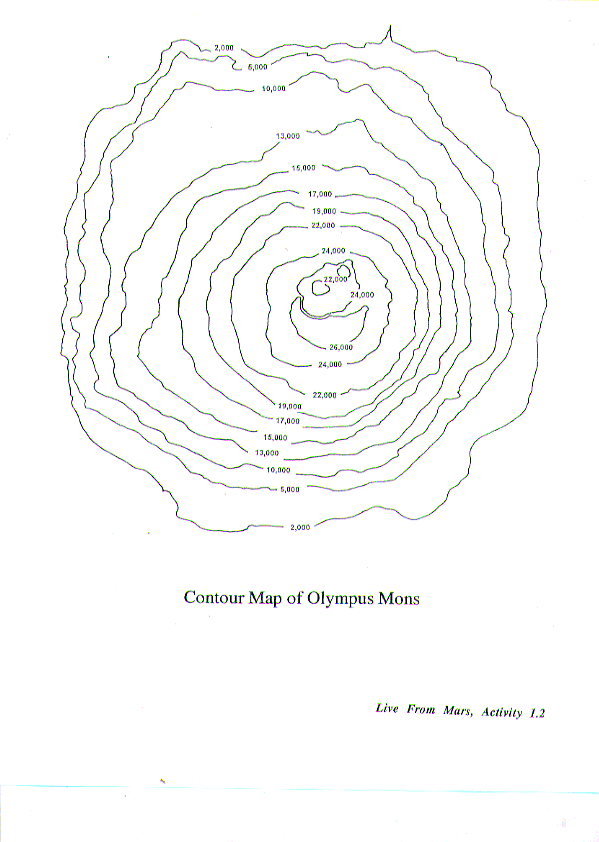
2. If you have had students create sections of Valles Marineris and Olympus Mons as the Challenge landscapes, assemble them and enjoy the view!
3. Suggested discussion questions:
4. Locate a topographical map of your area: what is the scale? What symbols are used?
5. Invite a Surveyor (perhaps a student's parent) to class: What tools do they use? Do they ever work with GPS (Global Positioning Satellite) which now provides altitude data, as well as latitude and longitude?
6. Record in Mission Logbooks successes or problems in completing this Activity.
Expand/Adapt/Connect
![]() MOLA's laser will fire
infrared pulses every ten seconds. These pulses of energy travel at the
speed of light (186,000 miles per second). NASA scientists can determine
the distance from the spacecraft to the land form below by timing how long
it takes the pulse to travel from the spacecraft to the surface and back
to the spacecraft (which you can think of as a kind of echo). Distance =
Speed x Time (e.g., travel at 50 miles per hour for 3 hours and you have
gone a distance of 150 miles.) If we divide this distance by 2, we have
the distance from the spacecraft to the ground.
MOLA's laser will fire
infrared pulses every ten seconds. These pulses of energy travel at the
speed of light (186,000 miles per second). NASA scientists can determine
the distance from the spacecraft to the land form below by timing how long
it takes the pulse to travel from the spacecraft to the surface and back
to the spacecraft (which you can think of as a kind of echo). Distance =
Speed x Time (e.g., travel at 50 miles per hour for 3 hours and you have
gone a distance of 150 miles.) If we divide this distance by 2, we have
the distance from the spacecraft to the ground.
Teachers of older students might have them calibrate their measuring rods in seconds instead of length. Then, remind students of the velocity of light and have them calculate the distances to the various points in their topographical models. As a starter, MGS's orbit is X kilometers (go on-line and find out...) above Mars. Given that the standard shoe box is Y centimeters high (measure one), and that the base of the box can be considered Mars' datum (see above) then each cm on the Altimeter represents Z seconds (here's the math challenge!)
![]() Research how laser
altimeters operate and report to class. Construct a visual (poster, 3-D
mock-up, etc.) to use in your report.
Research how laser
altimeters operate and report to class. Construct a visual (poster, 3-D
mock-up, etc.) to use in your report.
Research the use of sonar in other technologies and in the animal kingdom (dolphins, whales, bats).
Adapting this Activity to Higher or Lower Grades
Younger students may find this Activity still works well with arbitrary landforms, rather than those modeled on actual Martian topography. In this case, simply have each team create an interesting mountain/valley shape, which then becomes the challenge for other teams to survey and represent.
![]() For a sturdy model which
you'll be able to use multiple times, create the surface by crumpling
newspaper and covering it with aluminum foil. Pour plaster of paris or
apply papier mache over the foil, and spread the plaster all the way to
the box sides to anchor the surface. It's best to have 1-3 "mountains" or
one complex feature in each box; try to make the highest and lowest points
about 10 cm different in length.
For a sturdy model which
you'll be able to use multiple times, create the surface by crumpling
newspaper and covering it with aluminum foil. Pour plaster of paris or
apply papier mache over the foil, and spread the plaster all the way to
the box sides to anchor the surface. It's best to have 1-3 "mountains" or
one complex feature in each box; try to make the highest and lowest points
about 10 cm different in length.
Suggested URLs

![]()