 From the Hubble Space
Telescope
From the Hubble Space
Telescope
Teacher's Guide
Program 2:
Making Your Observations
From the Hubble Space
Telescope
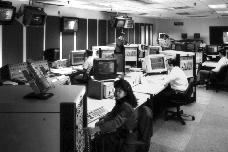
"Making YOUR Observations" will climax with a live "First Look" at the original astronomical data acquired as a result of the Passport to Knowledge observations. Planet Advocates Heidi Hammel, Marc Buie and participating K-12 students will see, at exactly the same moment, what we've collectively discovered about Neptune and Pluto, during a live uplink from the Space Telescope Science Institute, in Baltimore, Maryland (STScI). ("First Look" is what astronomers call their initial glimpse of new data: during the comet Shoemaker-Levy 9 collision with Jupiter, "First Look" was welcomed with whoops of delight and celebratory toasts, as we'll see during this program.) There'll be another, equally unique "First Look" as for the first time ever live cameras are welcomed into the Space Telescope Operations Control Center at NASA's Goddard's Space Flight Center. Though there's no live camera currently up in orbit to show us HST from outside, we'll see exactly where HST is at that precise moment, and exactly what HST is seeing. Via our live cameras, students will come as close, virtually, to HST as any human on Earth can ever be. Students will look over controllers' shoulders and see what happens as the telescope slews to acquire new guide stars, or "dumps" its data from the on- board tape recorder. If there is a spacecraft "Health and Safety" emergency, however, we will be unceremoniously booted out of the Mission Operations Room!
Videotaped sequences will show the wide variety of people it takes to operate HST, from astronomers and astronauts, to engineers, computer programmers, communications specialists, mathematicians, graphic artists, technical writers... secretaries. Footage from across America and around the world will show the diverse places, far from STScI and GSFC, where HST work is performed, and the processes which are involved. Students will see what HST has contributed to our understanding of the solar system, and will appreciate that while spacecraft missions have returned stunning, high resolution images of nearly all our local planets (except Pluto), HST provides ongoing coverage, functioning as a kind of "interplanetary weather satellite" for our cosmic neighborhood.
Heidi Hammel and Marc Buie will review what we know about Neptune and Pluto, what they hope the new images might reveal, and describe the hard work they'll be facing in the coming five weeks, to prepare the brand-new data for the April 23rd telecast. Students will find out how they also can work on the data, using custom software and lessons plans provided over the Internet by Passport to Knowledge and others. "Mrs. Jupiter," Planet Advocate Reta Beebe, shares images from the RbonusS orbit observing Jupiter which she's contributing to the project, and we see how researchers use the huge STScI data archive to compare and contrast past pictures to help make sense of new information.
The program will also provide an e-mail address where questions can be sent during the live broadcast, providing information about how to participate using e-mail or the World Wide Web. Students will meet some of the men and women on the Hubble team who've volunteered to write Field Journals and who'll be responding to student questions on-line as part of Researcher Q&A.
In addition to live uplinks from STScI and GSFC, students from Washington state will participate via satellite and interactive video: some of them played a role in the "Great Planet Debate" and will now witness results of the decision they helped make. In another first for Passport to Knowledge, students at the European Space Agency's ECF (European Coordinating Facility) in Garching, near Munich, Germany, will interact via videoconferencing. (ESA built the FOC, or Faint Object Camera, which will be used to image Pluto.) We expect e-mail input directly from schools in Brazil, some in Manaus in the Amazon rainforest, who will be watching the programs live via USIA's Worldnet.
I was interested in astronomy since I was a small child, I guess, and I studied physics in college, and mathematics. Those are very important backgrounds for astronomyI I became interested in astronomy through my father, an engineer who worked on the Pioneer and Viking missions. Even though he wasn't an astronomer, he was working on those missions. And even though, at the time, I didn't really understand what he did, just the fact that that's what he was doing got me interested. Also, a more specific example, was that Carl Sagan had a television show on PBS called Cosmos that I found very inspirational.


Ask students why we use telescopes to study the universe. Answers may center on the power of various telescopes and their ability to show distant objects close up. Tell students that while telescopes do give us visually magnified images of distant objects, this isn't really their main function. (General background on the electromagnetic spectrum, as well as several hands-on activities, may be found in the Live from the Stratosphere Teacher's Guide, or in NASA's Space Based Astronomy, co-packaged with this LHST Guide.)
 /
/

Materials For use in demonstrations by the teacher:
For each team of students
Procedure
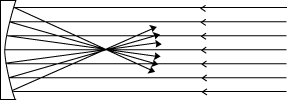
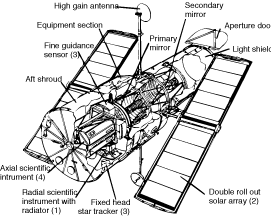
Sketch on the chalkboard how a concave mirror focuses radiation using a
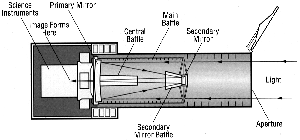
simple ray tracing diagram, as shown above. Explain that the HST's primary mirror is
curved like the drawing on the board (see cutaway HST diagram to left), and like the
demonstration mirror you have acquired for this activity.
Proceed with one or more of the demonstrations on the following page.
2 Focusing Infrared Radiation
For this demonstration, the classroom can be fully lit. Explain that concave
mirrors such as
this one, and that on the HST, are also capable of focusing infrared (IR or
heat) radiation
from objects on Earth and in space, just as they do visible light. At this point produce a safe
and handy source of infrared radiation such as an electric heater. Since
infrared radiation is
invisible to the unaided eye, challenge the students to suggest ways that you
can know
whether or not the mirror is indeed focusing this radiation from the heater. If a student
suggests using the thermometer or heat-sensitive paper, let them go ahead and
do the demo
for you! If not, produce an answer by holding up the thermometer. Note the
general
temperature in the room. Then place the heater several feet away from the mirror at the
same spot where you had placed the candle in the last demonstration and turn
the heater on.
After a few minutes, hold the mirror in one hand and the thermometer in the
other. Place
the thermometer at the same point where you placed the paper in the last
demonstration.
(Hint: as preparation you may want to have a C-clamp or other stand so that you can
precisely mark the place to hold your detector in this and the following
demonstration.)
Have one or two students read off the temperature. It will rise as the mirror focuses the
heater's otherwise invisible infrared radiation at this point in space. To parallel the first
demonstration more precisely, use the heat-sensitive paper: it will turn white where the
mirror focuses the IR radiation, and then turn colored once more when removed.
3. Focusing Ultraviolet Radiation Explain that concave mirrors such as the one on the HST are also capable of focusing ultraviolet radiation from objects on Earth and in space. Hold up the ultraviolet lamp for the class to see, plus the UV-sensitive beads or the jar of fluorescent luminescent paint and a small piece of plain paper. Explain that the paint and/or beads contain special chemicals that glow or change color when exposed to ultraviolet radiation. Apply the paint to the paper.
This time, darken the classroom as much as possible, if you use the paint rather than the beads. Turn on the UV lamp and place it in the same position as the candle and heater in the previous demonstrations. Hold the mirror in one hand and place the beads or painted piece of paper at the same place where you placed the tracing or wax paper. Students will begin to observe the beads change color or the paint glow from the concentrated UV radiation. Removing the beads or paper from the focus of the mirror will cause the glow to become reduced or to cease.
Procedure Divide the students into teams. Give each team the disk of dark paper 6 inches in diameter and a cup with the white paper circles made by a 3 ring hole punch. Explain that the white circles are about the size of the pupil of the eye. Ask the students to spread the white circles out onto the dark circle and estimate how many white circles cover the dark circle, with no overlap of white circles but as little dark material as possible showing through. Tell them to make their best estimate. When the team are through, write down their answers and ask the class to compute the average. Explain that the HST's main mirror has about 248 times more area than do their 6 inch paper disks. Have them multiply the average they calculated by 248 for their answer.
Finally have them calculate the answer directly by using the formula for the area of a circle:
A = p*r*r, where p = 3.1416 and r = the radius of the circle. (The relevant HST dimensions appear on the student worksheet.)
Discuss the reason for different answers to the above question using the two techniques. Which is more accurate? Also have students research and discuss what types of information might be learned about the planets by studying them in the infrared and the ultraviolet as well as in visible light.
With our eyes alone, we can only see things down to a certain level of faintness at night or in a darkened room. We are limited by the amount of light that can pass through the pupils of our eyes which rarely widen to more than 0.25 inches across.
Telescopes allow us to see fainter objects because a telescope takes all the light that falls on its main lens or mirror and focuses, or concentrates, it down into a narrow beam that can usually pass through the pupil of the eye. Thus if an astronomer looks out at night with a telescope like the HST which has a mirror some 94.5 inches across, he or she is looking out on the universe with the equivalent of eyes that are 94.5 inches across! No wonder we can see more with telescopes.
How much bigger is the HST's main mirror than the human eye? Well, it's 94.5 inches divided by 0.25 inches, or 378 times the diameter of your pupil! But the true ability of the eye or a telescope to gather light depends on the area of its lens or mirror, not its diameter.
So how much more light does the HST focus than your eye? Let's use two methods to find out.
Write your estimate here.
Write the average estimate of all the teams in your class here.
The HST's main mirror has an area about 248 times greater than your dark circle. So how many little white circles would it take to cover the entire main mirror of the HST? This is an estimate of how much more light falls on the HST than on your pupil, and so approximately how much more light the HST can focus.
How much more light does the HST focus than the lens in your eye? That's the same as asking how much greater is the area of the HST's main mirror than the area of the pupil of your eye. First, calculate the area of the HST's main mirror (All the information you need is contained in the Introduction to this Activity, at the top of the page.) Write your answer here _________.
Next, calculate the area of the pupil of your eye. Write your answer here. Finally, calculate how many times bigger the first area is than the second. Write your answer here ________.
Compare your answers using method #1 and #2. Which do you think
is more accurate?
Why?


Point out to the students that most of the objects that astronomers look at in the sky are very faint and that, accordingly, most of the HST's instruments are very, very sensitive to light. Ask them to think about objects which HST cannot look at because they are so bright that they would blind and ruin the instruments. (The obvious answer is the Sun - but in fact the moon is also too bright). Tell them that for safety reasons the HST is usually not pointed within about 45 degrees of the Sun. (Note: A fist held at arm's length is about 10 degrees across.)
/
Tell the students that in this activity they are going to serve in the important role of Mission Planners for the HST (STScI calls such specialists "Program Coordinators'" one of whom is Tony Roman, who'll appear on camera in Program 2, and whose comments may be found in this Guide.) For three different dates, students will determine which explain to the students that the planets and the Sun appear to move continuously relative to the "fixed" stars and so their changing positions need to be constantly tracked. Even though the planets of our solar system are close by, and relatively bright, they're literally "moving targets" and sometimes quite difficult to observe.
Materials (for each Mission Planning Team)
Procedure
Divide the students into Mission Planner Teams. Distribute materials to each
Team. Ask them to make a color key for their own reference, and assign a different colored
making pen to the Sun and each of the eight planets other than Earth. Point out the dates on
the three separate Coordinate Tables and have them mark each of their three Sky Charts
with one of the dates.
Illustrate how to plot a position on the first Sky Chart (March 14, 1996) using the Sun as an example. Have them mark their March 14 , 1996 chart making a small dot with the appropriate colored marking pen for the Sun. Then have them continue to plot and mark the positions of the planets on the same Chart. Have them proceed to the other two Charts and changed from one chart to the next.
Next, ask them to cut out their HST "Zone of Solar Avoidance" disk. Explain that this disk is designed to help them determine which planets are too close to the Sun to be safely observed with the HST. Make as many copies (or transparencies) as needed and give one to each team. Then, for each of the three Sky Charts, have the students carefully pin the center of the disk on the Sun. All planets lying within the disk are too close to the Sun to observe safely. For each Chart, have them complete the list on their Worksheets of which planets are safe, and which are not safe, to observe for the date of the Chart.
Ask students to research thoroughly the changing positions of planets to see if there's a planet which can never be observed with the HST.
In this Activity you and your team are going to become Mission Planners for the Hubble Space Telescope. Astronomers cannot just look at any planet with the HST, anytime they wish. This is because planets change position in the sky relative to the Sun, and the HST's instruments are so sensitive they are usually not pointed within about 45 degrees of the Sun. Sometimes, the planets wander too close to be observed safely. Your job will be to figure out for the astronomers, for three different dates, which planets can and cannot be observed with the HST.
Your teacher will pass out Sky Maps and Tables of positions for the Sun and the planets on three different dates. As instructed, plot the position of all these celestial objects on the appropriate Star Charts. Use the HST Zone of Solar Avoidance disk to determine which planets are safe to view and which are not for each of the dates in question. Once you have plotted all your data, fill the appropriate spaces in the Table below with the words SAFE or UNSAFE
PLANET   March 14, 1996  January 15, 1997  March 14, 1997
Mercury
Venus
Mars
Jupiter
Saturn
Uranus
Neptune
Pluto
Then answer the following questions.
1. What can you say about the position of the Sun on March 14, 1996 and March 14,
1997. Why?
2. Which two planets appear close to the Sun on all three dates?
Why do you think so?
3. The dashed line in your Charts shows the path of the Sun among the stars as seen
from Earth (known as the "ecliptic"). All the planets (except Pluto) lie very close to this
line. Why? (Hint: It has to do with the shape of the solar system)
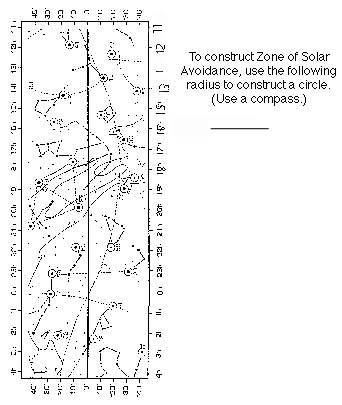
TABLE 1 March 14, 1996
OBJECT	R.A.	Dec.
Sun	23.6 hrs.	2.5 deg.
Mercury	22.9 hrs	-9.5 deg
Venus	 2.4 hrs.	16.2 deg
Mars	23.5 hrs	-4.2 deg
Jupiter	19.0 hrs	-22.6 deg
Saturn	23.9 hrs	-3.0 deg
Uranus	20.4 hrs	-19.9 deg
Neptune	20.0 hrs	-20.3 deg
Pluto	16.3 hrs	-7.8 deg

TABLE 2 January 15, 1997
OBJECT	R.A.	Dec.
Sun	19.9 hrs	-21.0 deg
Mercury	18.3 hrs	-20.9 deg
Venus	18.5 hrs	-23.1 deg
Mars	12.3 hrs	1.3 deg
Jupiter	20.1 hrs	-20.8 deg
Saturn	00.2 hrs	-1.3 deg
Uranus	20.4 hrs	-19.8 deg
Neptune	20.0 hrs	-20.3 deg
Pluto	16.3 hrs	-8.7 deg

TABLE 3 March 14, 1997
OBJECT	R.A.	Dec.
Sun	23.6 hrs	-2.5 deg
Mercury	23.8 hrs	-2.9 deg
Venus	23.3 hrs	-5.9 deg
Mars	12.0 hrs	4.2 deg
Jupiter	20.9 hrs	-17.8 deg
Saturn	00.5 hrs	1.2 deg
Uranus	20.6 hrs	-19.0 deg
Neptune	20.1 hrs	-19.9 deg
Pluto	16.4 hrs	 8.7 deg
Ask students to relate how a letter, sent from far away, gets to their house. Have them brainstorm a list of places the letter may have passed through - including the Internet - what kinds of vehicles may have been used to carry it, how long it took to travel to its destination, etc.
/
Explain that scientists need to send instructions up to HST as it orbits the Earth as well as receive data back from it. This activity will help students better understand the communications path between a scientist such as our Planet Advocates, and they themselves as LHST "virtual co-investigators," and the Hubble Space Telescope, showing how data are sent and received.
Materials
A minimum of eight students is necessary for this activity
Procedure
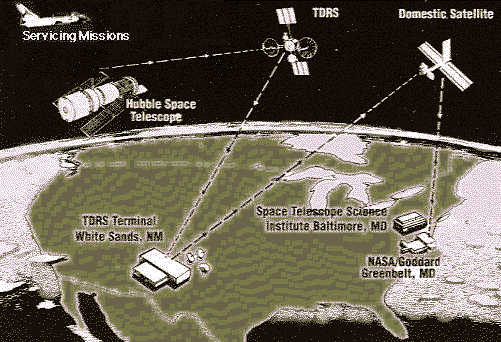
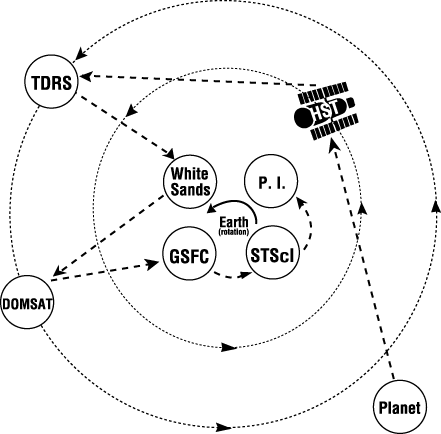
Show students the overhead transparency of the HST satellite data flow. Explain the diagram, following the data path as shown. Explain that the HST receives, stores, and later relays data that is detected by the telescope. Explain that TDRS is operated by NASA and communicates with the ground station at White Sands, New Mexico. TDRS is in a geosynchronous orbit, meaning it is synchronized with the Earth's rotation ("geo" meaning Earth). TDRS is approximately 26,000 miles from the center of the Earth. All geosynchronous satellites are positioned at this distance. Their period of revolution is the same as the time it takes for the Earth to rotate once around its axis. (NASA actually operates two geostationary satellites for HST, TDRS East and TDRS West, but only one TDRS communicates with HST at a time.)
Earth Locations
Four students are placed back to back in the center of the room forming a
circle that will represent the Earth. (This
is done for ease of the demonstration although in reality, all of the ground
stations are on
the continental United States and therefore the satellites would actually
only send signals to
a portion of the Earth rather than to the whole globe.)
Each of the four students is given a sign to wear-in consecutive order
from left to right:
P.I., STScI, Goddard, White Sands. This may sound complex, but just look at the
diagram looking down on Earth's north pole
locations and with an arrow specifying rotation and all will become clear!
Satellite Locations
The path of data from the planet to the P.I. is as follows: Planet, HST, TDRS, White Sands, DOMSAT, Goddard, STScI, P.I.
Motion in Space
Make sure students understand the difference between rotation and revolution. Within the revolution category are two subcategories, geosynchronous (or geostationary) revolution and non-geosynchronous revolution. For this demonstration, the only satellite that is non- geosynchronous is the HST. At this point, you may want to do a small "sub-demo" by having one student stand at the center of the room representing Earth, who will then rotate while one person on the outside (a satellite) follows the face of the "Earth." Students will clearly see that the Earth needs to rotate very slowly to allow time for the satellite to follow (around the circumference of the room). Then start the motion in space with everyone except the PLANET as described above. Now call out the path as the students throw the ball. Have them call out who they are as the ball is caught by each.
Variations: Data Drop-out
When someone drops the ball, it can be considered data "drop-out" and the ball
goes back to the planet again. Explain that a data drop-out can occur at any
point in the communication path.

Calculate the total time it takes light to travel the satellite pathway from our target planets via HST to Goddard. (Hint: remember the formula: Distance = Speed x Time.) What else do you need to know? Speed of Light = 186,000 miles per second. What about the number of miles between Earth, the various satellites, and the planets? The necessary information is all provided above and in Activity 1C-but students will have to apply some geometry to figure things out!
The original Satellite Dataflow activity, developed to help explain the operations of the Extreme UltraViolet Explorer satellite (EUVE) provided the following Math problem. (To make this applicable to HST, substitute HST for EUVE, and use 380 miles for the distance from the surface of the earth.)
You can also calculate the approximate speed of the EUVE given:
Watch on-line and on camera for more Challenge Questions.
At the edge of the solar system, orbits tiny Pluto. Like Neptune's moon, Triton, Pluto may have a thin nitrogen atmosphere that sometimes propels frosts and fogs across its icy landscape, and at other times freezes in place as Pluto's "seasons" change. Only closer study will reveal Pluto's climate and weather. Between Mars and Pluto are Jupiter, Saturn, Uranus and Neptune, giant worlds whose faces are but the tops of enormous, turbulent atmospheres, thousands of miles deep. Here weather is driven not by the Sun but by heat rising from within. Soaring air currents couple with the planets' rapid rotation rates to produce jet streams that can race at over 1,000 miles per hour and produce storms larger than the entire Earth. When astronomers speak about the atmospheres of the other planets, you'll hear them talk of winds, temperatures and atmospheric pressures. Much of the vocabulary of interplanetary weather will sound familiar to you and your students from tv weather reports, but the scale will be very different. After all, we're talking about other worlds, giant, strange and fascinating. Using the Hubble Space Telescope to study our planetary neighbors, scientists are studying weather on a cosmic scale, with many more examples than were available before the Space Age. In the process, they are trying not only to understand weather on each individual planet but also the similarities and differences between these worlds, and what they mean for Earth, now and in the future.

Ask students to think about the last time they or one of their family members took pictures with their still camera. Ask them how they think the image of the real world got from inside their camera into their hands as finished prints. (The answer is, of course, a physical thing called film which, after being exposed to light, is removed from the camera, chemically processed at the photo shop and returned as prints or slides). Ask them how they think we get pictures from the HST and other spacecraft? Early satellites did indeed parachute film packs back to Earth, but that's not the way it's done today. And astronauts aren't always popping up to change the film, so how does it work?
Figures for this section.
Instructions on how to make/use the diagrams.
Diagram of data strip placement.
Materials (for each team)
/
Have the students examine a TV or computer screen with a magnifying glass. Ask them to describe what they see. They'll note the picture is actually made up of little dots (called pixels, or picture elements.) Explain that the HST and other spacecraft actually send images to Earth by radio as a long string of numbers which tell the location and brightness of each pixel in the image. Then computers put all the pixels together like a great cosmic jigsaw puzzle. Explain that in this Activity, they are going to take the place of NASA computers and convert a string of coded data from a spacecraft back into the image of an actual object in space.
Tell them:
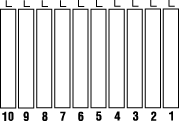
Instruct them to place the grid horizontally on their desk tops (with the "L" mark on the left) and begin to encode the image by placing the first number in their data stream in the uppermost left box in their image grid. (Here they are doing, in a greatly simplified way, what the CCD detectors on board a spacecraft do when they observe a target.) Then place the second number in the data stream in the box on the same line immediately to the right, the third number in the next box, etc. When the first line is complete, tell them to begin filling in the second line of the grid, again from left to right, and continuing until their entire grid is filled in. Then one member of the team should re-read the numbers as the others check for accuracy.
When all teams have completed this task, pass out a set of paper sheets to each team. Explain that the shades of brightness and darkness correspond to the numbers sent down by the spacecraft with 0 representing pure white, 1 light gray, 2 dark gray and 3 representing black. Tell them to carefully cut the pieces of paper into small squares each the size of one of the grid boxes and to group each different color into a different pile. (An alternative is to use a paper-cutter, carefully, to mass produce squares in advance, then distribute them in paper cups) Have students glue an appropriately shaded square over each correspondingly-numbered grid box. Be sure to have one member of the DAT time how long the process takes to code their grids. When all the DATs are finished, assemble all the pieces of the image to create the full image (as shown below left) on a larger piece of paper or card. As the image comes together, challenge them to identify it, giving clues as you go. When completed, tell them the significance of Jupiter's Great Red Spot, and show them the actual image from Voyager 2 for comparison (to be seen in Program 1, "The Great Planet Debate" and on the HST lithographs co-packaged with the Guide).
Relate the coarsely-detailed (or "low resolution") image the students assembled to an actual image from the HST, as on the enclosed lithographs. These images clearly have more detail because they contain many more pixels in the same space and incorporate many more shades of gray between white and black. In short, it contains much more (picture and computer) information.
(See Activity 3A page 30 for how black and white data becomes a color image.) Have the students compare the number of pixels and shades of gray in their image and one from the HST, using the information given in their Worksheets. Finally, ask them to calculate how much longer it would have taken them to assemble the real image at the rate they worked.
The Hubble Space Telescope and other spacecraft, including weather satellites, take pictures using video technology and devices known as charge coupled devices, or CCDs for short. Like a picture on a TV set or computer screen, each image is made up of thousands of tiny dots or picture elements ("pixels"). The pictures are not sent down to the ground as hard copy. Instead, the photons of light reflected off an object are collected by the sensitive CCDs, and recorded and analyzed pixel by pixel. Then, the information on the location of each pixel within the picture and the brightness of that particular pixel is radioed down to Earth. Computers convert this information back into light and dark spots and place these pixels in their correct positions, so that a complete picture is re-constituted by computer. Prints and slides can then be made. This is the process you and your students will see happening for images of Jupiter, Neptune and Pluto during the videos, and you'll be able to follow the Planet Advocates' image processing work on-line, during the hectic weeks between the live broadcasts.
Another key thing to appreciate is that the HST and other spacecraft take their images in
black and white. Yet we see beautiful spacecraft images in full color, such as
the M-16/Eagle Nebula picture co-packaged with this Guide. How is this
possible? To make a
color image of an object, the spacecraft takes several black and white images,
each through a different colored filter. By carefully examining how bright
different parts of the object look through the different filters, scientists
using computers can figure out the true appearance of the object, and so
re-create a realistic color image.
Pictures from Outer Space
This program will take the form of a highly interactive scientific symposium, oriented to
students, announcing the first results achieved by Live from the Hubble Space Telescope.
A live student audience of over one hundred will join Marc Buie and Heidi Hammel in
STScI's main auditorium in Baltimore, with e-mail and CuSeeMe input from other students
around the nation and the world. Heidi and Marc will share preliminary findings, and
respond to comments based on the parallel work that's been done by students. We'll
review the questions which initially motivated student interest in Pluto and Neptune during
the the "Great Planet Debate," and see which have been answered and which require more
analysis or research.
Live uplinks in America will include the Buhl Planetarium at the Carnegie Science Center in
Pittsburgh, Pennsylvania (where students helped make our original planet selections via
interactive technology) and Los Angeles, California, a school district making a major push
to integrate the Internet into the curriculum. The program will provide considerable "give
and take" between the Planet Advocates and their student "Co-Investigators," as students
witness live the process of testing scientific hypotheses, verifying results and sharing new
findings with peers to substantiate their significance.
Videotaped sequences will document "A Day in the Life...," taking us behind the scenes as
Heidi Hammel works to transform raw planetary data into new knowledge: Heidi also
plans to post a Field Journal of her image processing successes and (only temporary, we
hope!) frustrations on-line. A second sequence documents the parallel process in one of our
participating schools, where students employ user-friendly and freely accessible graphics
packages to analyze the same data. To help explain the technical steps in image processing,
we see how the stunning images of the Eagle Nebula (as seen in the co-packaged poster)
ends up on the cover of Time for Kids. Footage from giant storms on Earth, and images
from HST and other spacecraft, allow us to compare and contrast weather on Earth and our
neighboring planets: we come to understand the dynamics underlying the images of
(possible!) bright or dark clouds on Neptune, and seasonal changes (perhaps!) on Pluto.
The concluding tape sequence shows "What's Next?," describing the next HST Servicing
Mission (slated for early 1997), plans for the first-ever spacecraft mission to study Pluto
and Charon closeup, and initial concepts for a Next Generation Space Telescope, one of
whose main functions would be to search for planets around other stars.
Viewers will be reminded about how to participate on-line, and how to utilize the project on
tape after the live telecast.
It's unfortunate the way a lot of basic science starts in schools these days with a list of facts
to be memorized, and lists of experiments and discoverers�this guy discovered that and
that gal discovered this other thing. This lends a sort of inevitability to the process when
it's really quite haphazard. Its all by guess and by gosh, it's not planned at all. The chances
of finding something new are present in any observation, whether it's with the Space
Telescope, with a ground-based observatory, or made by somebody from their back yard.
People discover comets from their back yards all the time.
There is a chance, in any observation made by any person, that you'll find something new,
and all you have to do is have an inquiring mind, and be open, and be alert, and be aware
and don't accept as a given everything that you've been told. Don't accept that the universe
is understood, but rather that the universe is a big, beautiful mystery that we are all trying
to unravel.
Finally, consider the following: The total number of pixels in the image that your class
assembled was 1,120. Each pixel had one of four numbers assigned to it,
designating one
of four shades of gray, white and black. That means it took 1,120 x 4, or 4,480 pieces of
information to make this picture.
That may seem like a lot but an image of Jupiter from the HST's Wide Field
Camera would use about 640,000 pixels, each of which can have any one of 2,048
different shades of gray. That makes for a much clearer, smoother picture but
it takes much more information to create it. How many pieces of information
would it take to make such an image________?
Program 3:
Announcing YOUR Results
First airs live April 23, 1996, 13:00-14:00 Eastern
Alex Storrs, Planning Scientist, Moving Targets, STScI
You and your Team of Data Analysts are going to take the place of NASA computers and
decipher an image beamed down from space. (This is an actual image, created in 1979 even
though it's been simplified for this activity.) Your team will be responsible for putting
together part of the overall picture. Your teacher will pass out a special grid and a stream of
numbers sent down by the spacecraft. Encode the grids with the numbers as instructed by
the teacher. As you begin, notice what time it is and write the time here.
You'll receive several sheets of paper, 4 colors ranging from pure white to pure black.
Carefully cut them into squares the size of the grid boxes and attach the correct squares to
the grid as explained by your teacher.
When you are done, your team will have completed one portion of the image. Again, note
the time here.Now, answer the next five questions and when you're finished tell your
teacher that your grid is complete.
What was the total amount of time it took
your team to
complete its
assignment__________?
How many pixels were there in your team's grid__________?
How many teams are there in your class________?
How many total pixels are there in the overall image put together by the class______?
Now your teacher will collect all the completed portions of the image and put them together
so you can see what the spacecraft was seeing.
Based on how long your DAT took to assemble your part of the image, (put
together 4,480 pieces of picture information) calculate how long it would take
your team to assemble one entire HST image of Jupiter. Write your
answer: ______
NASA computers take less than 5 minutes for the same task. Can you see why
NASA likes to use computers?
DATA STREAM for "Pictures from Outer Spacei"
Team #1
0000	0001	1100	1100	0112	1112	3333
0000	0100	1211	1110	0120	2233	3333
0001	0010	1221	1111	1120	2333	3333
0001	0000	1122	1111	1122	2333	3333
Team #2
0011	1000	0022	1101	1122	2323	3333
0112	2100	1022	1101	1111	2223	3333
0122	2210	0102	2211	1111	2223	3333
0121	2222	0101	1111	2111	2122	3333
Team #3
1211	1112	2111	2211	2110	2212	2333
1211	1111	2211	1221	1101	2212	2333
1210	2211	2221	1222	1111	1122	2333
1210	2222	2221	2122	1111	1112	2333
Team #4
0210	2222	2222	1112	1222	1121	2233
0120	1122	3222	2111	2211	2121	2233
0021	1222	3322	3211	2100	1211	2233
0021	1223	3332	3212	1000	0121	2223
Team #5
1012	1112	3332	3212	2000	0021	1223
1012	1112	3333	2312	2000	0012	2223
2111	2121	2333	2322	2100	0002	1223
2111	2111	2333	3332	2210	0001	2223
Team #6
0210	1211	2233	3332	1221	0001	2313
0220	0221	1222	2232	1222	1001	2333
0211	0022	2222	2332	1212	2222	2233
1012	1002	2222	3232	1222	2222	2223
Team #7
2001	2101	2233	3332	1221	1122	2332
2300	1210	1123	3332	0122	1211	2332
3210	0012	2223	2332	0112	1212	2333
3221	1100	1222	1221	0011	1122	2333
Team #8
3222	2221	0123	1222	1011	2222	2333
3321	2212	1001	0112	1011	2232	2333
3321	1221	1000	0111	1001	1222	3233
3331	0122	2110	2111	1000	1212	1323
Team #9
3331	0122	2111	2121	1100	1122	1333
0001	0120	0000	2111	1100	1122	1333
3332	0120	0000	1210	2100	1122	2232
3332	1100 0010	1111	2100	1121	2332
Team #10
2323	2100	0011	1222	1110	0122	2222
2323	2110	0111	1122	2221	0112	2222
2332	2122	2211	1112	2121	0112	1222
2332	2111 1011	1122	2222	0112	2222
Question Marks
Space,
   deep, dark hellish space,
Continuing light years of nothingness
No one can discern the oddities of space.

The planets
   lands of barren matter,

The blazing, flaming colossal sun
Continues to burn,
   and burn,
     and burn.

Perhaps a herd of bizarre creatures,
  and maybe nothing at all,

Perhaps another dimension,
  and maybe nothing at all,

No one really knows how we got here,
  and maybe we're nothing at all.

Stephen Smethers, Summit Middle School.
Return to Table of Contents.
-- Previous Section.
-- Next Section.
![]()