Activity 1.4.2
Layers in the Water Column
Materials (for each group of 3/4 students):
- clear plastic drink bottles of various sizes (ends cut off)
- clear plastic tubes
- stoppers and plugs from plumbing stores
- rubber tubing
- plumbing clamps
- clothespins
- a 1-quart glass beaker or wide mouth jar
- blue & green food coloring
- salt
- water
- safety goggles
- Activity 1.4.2 Student Worksheet
Procedure :
- To create a three-layer system (an "ocean") [See Figure 1]
with distinctive colors for each layer:
a. Dissolve as much salt as possible in half beaker of water. Add 5-7 drops
of green food coloring to the beaker and stir for several minutes. Keep
adding salt until some salt remains at the bottom.
b. Next, add 5-7 drops of blue food coloring to fresh water, and carefully
squeeze several eyedroppers of the fresh water on the surface of the salty
water. When the water movement dies out, you should have a stable, two-layered
system, with the denser green salt water below the blue fresh
water.
c. Finally, mix some slightly salty water in another beaker.
Fill an eyedropper with the slightly salty water and place a few drops
at the surface of the top fresh water layer. (It should sink through the
fresh water and come to rest at an intermediate level, showing three distinct
layers: blue (fresh water) on top, clear (slightly salty water) in the middle,
and green (very salty water) at the bottom after coming to rest. [See Figure
1]
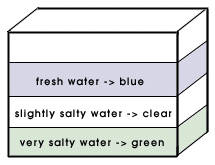
Figure 1
- Now dip a long straw down into the layer you want to sample. Hold your
finger over the end of the straw and lift it up. Empty the straw into a
dish. Did you get the water color you wanted?
Why or why not?
- Hang a short section of straw on a string so it descends to the layer
you want to sample.
* How can you close off the two ends so that you can bring up just what
you want?
* Did you get the water color you wanted?
- Design a spring-loaded device which will pull caps in at both ends
of a clear tube. Use stoppers which fit the ends. Attach the stoppers to
an elastic tube which pulls them both into the bottle. Place a hook at
the side of each stopper. Pull the stoppers out from the ends and tie the
hooks with a line to keep the ends from snapping into the tube. [See Figure
2]
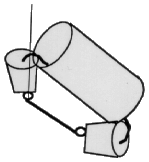
Figure 2
- Now hang the device from a support line. Design a way to release cord
holding the rings on the stoppers. Perhaps one ring can be held with a
spring-loaded clothespin. By sliding heavy washers down the line to crash
into the clothespin, the ring may be released and the stoppers pop into
the bottle ends.
Be prepared to demonstrate your "Bottom Sampling Device" to
the rest of the class! If you had more time and/or better materials, what
improvements might you make on your device?
What factors or conditions in the Antarctic might affect how well your device
works?
Student Worksheet #1.4.2
